
Kitchen Cabinet Organization Ideas: 25 Storage Solutions That Actually Work
Kitchen cabinets hold cookware, dishes, ingredients, and more, which means they often become cluttered and hard to navigate. Efficiently organizing kitchen cabinets makes essential items easily accessible, maximizing your time for cooking, eating, and entertaining. According to the National Association of Professional Organizers, the average kitchen wastes approximately 30% of its available cabinet space due to poor organization, incorrect shelf heights, and unused vertical areas.
This comprehensive guide provides 25 proven organization strategies with step-by-step instructions, product recommendations, cost breakdowns, and expert advice. Whether you are managing a compact apartment kitchen or a large family cooking space, these solutions will transform your cabinets from a source of daily frustration into a model of efficiency.
Why Kitchen Cabinet Organization Matters
A well-organized kitchen is not just about aesthetics. Research from the Kitchen Cabinet Manufacturers Association shows that homeowners spend an average of 15 minutes per meal searching for items in poorly organized cabinets. Over a year, that adds up to over 90 hours of wasted time. Proper organization reduces search time, prevents duplicate purchases, minimizes food waste, and creates a more enjoyable cooking experience.
The foundation of effective kitchen organization is the zone-based system. Professional kitchen designers break cabinet space into five functional zones: prep, cooking, serving, storage, and cleaning. Each zone holds the tools and ingredients used for that specific task, cutting down trips across the kitchen mid-recipe.
The 5-Zone Kitchen Organization System
Before purchasing any organizers, understand the zone-based approach that professional kitchen designers use. This system mirrors how you actually use your kitchen and eliminates unnecessary movement.
| Zone | Location | Store Here | Key Organizers |
|---|---|---|---|
| Prep Zone | Near cutting board area | Knives, mixing bowls, measuring cups, cutting boards | Drawer dividers, knife strip, vertical board organizer |
| Cooking Zone | Near stove/range | Pots, pans, oils, spices, cooking utensils | Pull-out spice rack, pot lid organizer, utensil caddy |
| Serving Zone | Near dining area | Plates, glasses, silverware, serving dishes | Shelf risers, plate rack, stemware holder |
| Storage Zone | Pantry or tall cabinets | Dry goods, canned food, bulk items, small appliances | Clear containers, pull-out pantry, lazy Susan |
| Cleaning Zone | Under sink | Cleaning supplies, trash bins, dish soap, sponges | Tension rod, under-sink organizer, door hooks |
1. Install Pull-Out Shelves in Deep Cabinets
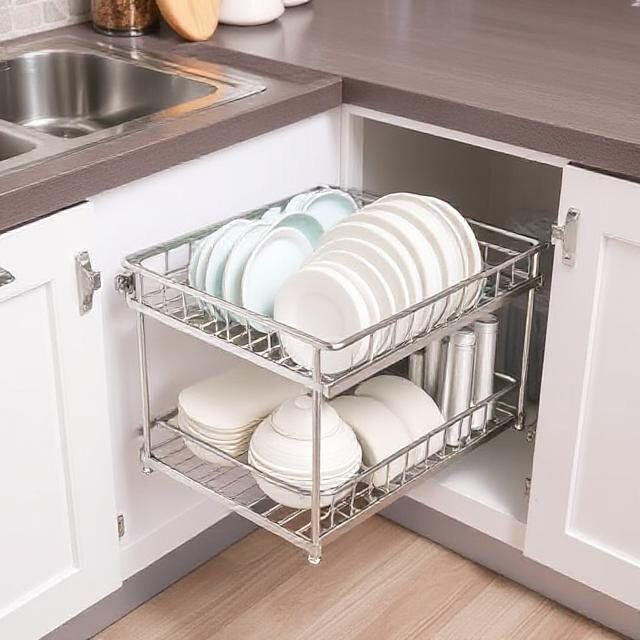
Deep base cabinets are the black holes of kitchen storage. Items pushed to the back become invisible and inaccessible. Pull-out shelves (also called roll-out trays) solve this problem by mounting on full-extension ball-bearing slides that bring back-wall items to the front.
Installation requires a drill, number 8 x 1-inch screws, and approximately 20 minutes per shelf. Check the cabinet’s face frame width: undermount slides need about 1.5 inches of side clearance. Common sizes are 18, 21, and 24 inches wide to fit standard cabinet frames.
| Specification | Details |
|---|---|
| Common widths | 18″, 21″, 24″ |
| Slide type | Full-extension ball-bearing |
| Installation time | 15-25 minutes per shelf |
| Tools needed | Drill, level, tape measure, #8 x 1″ screws |
| Cost range | $30-$80 per shelf (quality dependent) |
| Weight capacity | 75-100 lbs per shelf (ball-bearing type) |
Important measurement note: A 24-inch-deep base cabinet does not mean pull-out shelves can be 24 inches. Account for the door thickness (approximately 3/4 inch), the face frame (another 3/4 inch on framed cabinets), and 1 to 2 inches of clearance so the tray does not hit the door when closing. Effective pull-out depth is closer to 20 to 21 inches.
2. Use Adjustable Drawer Dividers
Gone are the days of rummaging through a jumbled utensil drawer. Adjustable dividers let you create custom compartments for spatulas, whisks, measuring cups, and everything in between. What makes adjustable dividers superior to fixed versions is that you can reconfigure them whenever your needs change.
For best results, group utensils by function: cooking utensils (spatulas, ladles, tongs) in one section, baking tools (measuring cups, spoons, pastry brushes) in another, and eating utensils (forks, knives, spoons) in a third. Place the cooking utensil drawer near the stove since you will need those items while cooking.
3. Add a Spice Pull-Out Rack
Nothing kills momentum during meal prep like hunting for that one spice you know is in the cabinet somewhere. A slim pull-out spice rack mounted inside a cabinet door or next to your stove keeps everything visible and within arm’s reach.
For kitchens with limited cabinet space, use the narrow space next to the stove to store your favorite spices and flavoring ingredients. Add a pullout rack inside the cabinet door to organize your spices. If you have a little more room, consider installing a turntable on one shelf so you can easily reach bottles of oil and vinegar.
4. Use Vertical Dividers for Baking Sheets and Cutting Boards
Vertical dividers organize baking sheets, cutting boards, and lids that topple when stacked. Adjustable versions use tension rods or pegs slotted into shelf holes. Fixed dividers cut from 1/4-inch plywood or acrylic work better for heavy cast iron. Space dividers 2 to 3 inches apart for sheet pans, 1 to 1.5 inches for lids.
Skip the frustration of sifting through eight to 10 baking pans to locate the one you need. Install vertical organizers to one of your lower cabinets and use the slots as a baking pan filing system. Organize your cookie sheets and cake pans by size and then slide them into the adjustable rack for a neat, navigable cabinet.
5. Implement a Zone-Based System
Top kitchen organization experts in 2026 recommend zoning rather than categorizing by item type. Store plates near the dishwasher, cooking utensils near the stove, and glassware near the sink or bar area. This zone-based approach mirrors how you actually use your kitchen and cuts down on unnecessary movement.
Shea McGee, home decor expert and founder at Studio McGee, explains: “By grouping items by function, the kitchen flows effortlessly, and everything feels intentional and easy to find.” This technique is especially effective in smaller kitchens where every footstep counts.
6. Use Clear, Uniform Containers for Dry Goods
Clear containers transform pantry chaos into visual calm. When you can see what you have at a glance, you stop buying duplicates, waste less food, and spend less time searching. Uniform containers also look significantly better, turning your pantry into something you would actually want to show off.
Decant other foods and spices into clear or labeled containers. Glass or acrylic containers are recommended because the transparent material minimizes visual clutter and makes it easy to locate and take stock of the items on hand. Invest in canisters, tubs, and baskets in finishes that are a visual extension of your cabinets or kitchen design.
7. Install Under-Shelf Baskets
Do not overlook the vertical space inside your cabinets. Under-shelf baskets hang neatly beneath existing shelves, effectively doubling your storage capacity without any permanent modifications. They are perfect for storing lightweight items like snack bags, foil wraps, or small appliances.
These work only if there is at least 4 inches of clearance between the shelf and items below. Wire or bamboo models are recommended over plastic for durability. Place them in upper cabinets for maximum effectiveness.
8. Maximize Corner Cabinet Storage
Corner cabinets are the Bermuda Triangle of kitchen storage. Standard 90-degree corners with single doors give access to maybe 40% of interior space. The rest requires a headlamp and elbow grease. There are three main solutions depending on your cabinet type.
| Solution | Best For | Pros | Cons | Cost |
|---|---|---|---|---|
| Lazy Susan | Individual items (jars, cans) | Easy access, rotates fully | Not good for stacked items | $30-$80 |
| Blind Corner Pull-Out | Pots, pans, large items | Reclaims 70% of space | More complex installation | $150-$300 |
| Swing-Out Shelves | Upper corner cabinets | Brings back contents forward | 15-25 lb weight limit | $50-$120 |
Lazy Susans remain the most common fix. Full-round models need a cabinet at least 33 inches wide to spin freely. Kidney-shaped versions fit smaller corner uppers. Ball-bearing mechanisms last longer than plastic-on-plastic spinners. Load heavy items toward the center and lighter ones at the rim to prevent tipping.
9. Adjust Shelf Heights to Match Your Items
Shelf height is the most adjustable variable and the most overlooked. Factory shelves sit 10 to 12 inches apart, wasting vertical inches above short items. Drill new peg holes every 1.5 to 2 inches using a pegboard jig for consistent spacing.
| Item | Required Clearance | Notes |
|---|---|---|
| Dinner plates | 9-10 inches | Stack 4-6 plates per shelf |
| Cereal boxes | 11-12 inches | Allow 1 inch extra for lids |
| Coffee mugs | 7-8 inches | Can double with shelf riser |
| Pots and pans | 6-8 inches | Store lids separately |
| Canned goods | 5-6 inches | Use tiered risers for visibility |
| Baking sheets | 3-4 inches (vertical) | Use dividers, not stacking |
Measure the tallest item in each category, add 1 inch for clearance, and set shelves accordingly. This simple step can recover 20-30% of wasted cabinet space.
10. Use Shelf Risers to Double Your Space
Shelf risers can literally double your usable cabinet space, especially for flatter items like low-ball glasses and dinner plates. Look to sturdy wood or metal options rather than plastic for a longer-lasting system. “Risers have really worked well for me to get more storage out of each shelf because taking advantage of going vertical opens up plenty of unused space,” says organizing expert Katie McMenamin Sabo.
Expanding types adjust from 12 to 24 inches wide. Avoid flimsy plastic models and look for risers rated to hold 10+ pounds per tier. Stack similar items on each level: plates on the bottom, bowls on top, or mugs on the bottom, small plates on top.
11. Organize Pots and Pans with a Peg System
A deep drawer is a smart organizing idea for pots and pans near the stovetop. Use drawers to hold dishware by adding dish divider dowels to keep plates, bowls, and saucers stacked tightly in place. Make sure the drawer is equipped with quality sliding hardware that can hold the weight of dishes when the drawer is fully extended.
For cabinets with fixed shelves, use a pegboard system. Create custom plate storage with the help of a pegboard organizer. A pegboard allows you to create tidy plate stacks that will not move when you open and close the cabinet. Pegboards are ultra-adaptable, enabling you to move and adjust custom layouts to suit varied plate dimensions.
12. Install a Pot Lid Organizer
Pots and pans and their lids can be some of the most challenging kitchen items to organize. “Try using a peg system or a divider system to hold thinner pans upright instead of stacking them on top of each other in a drawer,” recommends Emily Arthur, chief creative officer of Isla Porter.
A dual-level lid organizer stores all your glass and metal lids in one compact space. Mount it inside a cabinet door or lay it flat in a drawer. This eliminates the avalanche of lids every time you open the pot cabinet.
13. Create a Baking Station
Fancy yourself as a professional baker? Treat your cabinets to bakery-level organization and ease using transparent canisters and baskets. Using acrylic or glass organizers is recommended because the transparent material minimizes visual clutter. The upper cabinet shelves feature cohesive clear containers and color-coordinated mixing bowls to create a makeshift baking station.
Group all baking supplies together: flour, sugar, baking powder, vanilla extract, measuring cups, mixing bowls, and baking pans. Store them in one designated area so you can grab everything at once without searching multiple cabinets.
14. Organize Under the Kitchen Sink
Organizing the cabinet under your kitchen sink can be tricky due to pipes and the sink bottom, but it is possible with some clever solutions. Consider using stackable shelves or sliding acrylic shelves that fit around the U-shaped pipe to maximize space. Storage bins, shelves, and hooks inside the cabinet doors can also provide additional storage.
Install a tension rod across the top of the cabinet to hang cleaning spray bottles. This keeps them visible, accessible, and off the cabinet floor where they tend to tip over and leak. Use the door interior for mounted caddies to hold sponges, scrub brushes, and small cleaning tools.
15. Use the Inside of Cabinet Doors
The inside of cabinet doors is prime real estate that most kitchens waste. Mount narrow racks or hooks to hold cutting boards, pot lids, measuring cups, cleaning supplies, or spice jars. Command strip-mounted caddies are excellent for organizing small items that you need quick access to without drilling holes.
For under-sink cabinets, adhesive sponge holders are wide enough to store items but do not interfere with fully closing the cabinet door. Install them on the door interior for instant extra storage.
16. Organize Food Storage Containers
Prevent an avalanche of food storage containers every time you open your cupboard door. Divide your stash of plastic into stacks of containers and lids. Stacking containers into each other like nesting dolls and storing them in a larger tray is a space-saving option for organizing kitchen cabinets. Lids can also be gathered in containers or stored with a roll-up drying rack.
Streamlining food storage container organization can be overwhelming. There are so many shapes and sizes to sort through, between the lids and containers themselves. Go through your entire collection to see what you have, what you can get rid of, and what you might need to invest in. Keep only matching sets and discard orphaned pieces.
17. Create a Snack Station for Families
Individual servings of prepackaged snacks can be slippery and impossible to stack. To create an organized kitchen snack cabinet, gather small containers such as trays, baskets, or bins to hold similar items in your pantry cabinet. You will also be able to tell at a glance when it is time to go grocery shopping again.
Place snacks on a shelf that everyone in the family can reach. Designate another area for breakfast staples like cereals and pancake mix to streamline your morning routine. This prevents kids from rummaging through multiple cabinets and creating messes.
18. Maximize Vertical Wall Space
Take advantage of vertical wall space with open shelving that extends to the ceiling. Open shelves let you display your prettiest kitchenware while making everything easy to spot and grab or put away. If you do not want to tear out built-in cabinets but like the idea of open shelves, remove a few doors and paint cabinet interiors to display your belongings.
Most cabinets have 6 to 10 inches of unused vertical clearance between the top shelf and the cabinet ceiling. Stackable bins, under-shelf baskets, or an extra shelf level reclaim that space. Simple organizational habits like quarterly shelf audits keep systems from backsliding into clutter.
19. Use Magnetic Storage Solutions
The surface underneath your cabinets can also be used to keep items organized and off of countertops. Spices are stored in jars and affixed with magnets to a strip on the underside of cabinets. Not only is this a great storage solution for spices, but it also frees up interior cabinet space for housing other items.
A magnetic knife strip mounted on the side of your upper cabinets keeps important tools in easy reach of adult hands and away from little fingers. This eliminates the need for a bulky countertop knife block.
20. Organize Wine and Beverages
Most wine lovers need a few favorites on hand rather than a full cellar. A clever method for organizing wine is adding a wine bottle holder insert. You can also retrofit an existing cabinet by removing the door and adding an insert. For stemware, install hanging racks underneath upper cabinets to display glasses while saving shelf space.
21. Install Pull-Out Trash and Recycling
When recycling bins are easy to reach, you are more likely to use them. Tuck paper, plastic, and glass bins inside pullout cabinets near your cleaning area. These cabinets often have cutouts designed to hold plastic waste bins, making it easy to lift out and empty them as needed.
22. Use Drawer Organizers for Flatware
Use an insert or drawer divider to keep your drawer items organized and prevent them from rattling around. With different compartments, you can easily spot what you need. Small containers between dividers are perfect for rounding up tiny objects like rubber bands, paper clips, and twist ties.
Place the flatware drawer near the dishwasher or sink where they will be washed. Arrange the forks on the left, then the knives next to them, and the spoons last in order to lay out the utensils the same way you would prepare a table setting.
23. Declutter Before You Organize
When organizing your kitchen cabinets, start by purging anything you do not use regularly, including dishware, entertaining pieces, and small countertop appliances. From there, decide how you are going to group your remaining pantry supplies and dishware and where to locate everything logically in your kitchen.
It is also a good idea to invest in organizational tools such as a flatware divider or pot rack that will help calm any chaos within your cabinets and allow you to maintain organization. The key to successful organizational systems that can actually be maintained is creating spaces that are not overcrowded.
24. Store Items by Frequency of Use
Convenience is key. Place frequently used items in the most accessible spots and rarely used items higher up or deeper in cabinets. Store appliances that you do not use often, party items, cookbooks, or bulk items in upper cabinets or the back of deep shelves. Frequently used food should be placed in areas that are easier to access.
| Frequency | Storage Location | Examples |
|---|---|---|
| Daily use | Eye level, front of shelf | Plates, mugs, everyday glasses |
| Weekly use | Mid-height, accessible | Measuring cups, mixing bowls |
| Monthly use | Upper shelves, back of cabinet | Baking supplies, specialty tools |
| Rarely use | Highest shelves, deepest storage | Holiday dishes, party platters |
25. Label Everything
It sounds basic, but labeling is one of the most underrated kitchen organization strategies. A simple label maker or even handwritten tags on containers helps every member of the household know where things belong and, more importantly, where to put them back. In busy households, this simple habit makes the difference between organized and organized-for-one-week.
Kitchen Cabinet Organization Cost Breakdown
Understanding the investment required helps you prioritize which upgrades deliver the most value for your budget.
| Organizer Type | Quantity Needed | Budget Option | Mid-Range | Premium/Custom |
|---|---|---|---|---|
| Pull-out shelves | 4-6 per kitchen | $30 each | $60 each | $120 each |
| Drawer dividers | 2-3 per drawer | $10 set | $25 set | $50 set |
| Lazy Susan | 1-2 per corner | $25 each | $50 each | $100 each |
| Shelf risers | 2-4 per kitchen | $12 each | $25 each | $45 each |
| Clear containers | 10-20 per kitchen | $3 each | $8 each | $15 each |
| Under-shelf baskets | 3-5 per kitchen | $8 each | $15 each | $25 each |
| Spice rack | 1-2 | $15 each | $35 each | $70 each |
| Lid organizer | 1-2 | $10 each | $20 each | $40 each |
| Total Budget | $200-$400 | $500-$900 | $1,000-$2,000 |
From Our Sourcing Team
Compare Organization Products: Quick Decision Guide
| If You Need… | Best Solution | Why | Cost |
|---|---|---|---|
| Access to deep cabinets | Pull-out shelves | Brings back items to front | $30-$80 |
| Organize utensils | Adjustable dividers | Customizable compartments | $10-$50 |
| Spice visibility | Pull-out spice rack | Slim profile, easy access | $15-$70 |
| Corner cabinet access | Blind corner pull-out | Reclaims 70% of space | $150-$300 |
| Pantry efficiency | Clear airtight containers | Visibility + freshness | $3-$15 each |
| Baking sheet storage | Vertical dividers | Prevents stacking frustration | $10-$30 |
| Under-sink storage | Tension rod + caddy | Uses dead space | $5-$20 |
| Double shelf space | Shelf risers | Creates vertical layers | $12-$45 |
Compliance and Quality Standards
When sourcing kitchen organization hardware for commercial or hospitality projects, verify compliance with relevant standards. Food-grade containers should meet FDA food contact standards. Metal organizers intended for commercial kitchens should be manufactured from SUS304 or SUS316 stainless steel for corrosion resistance. Pull-out shelf hardware should meet BIFMA standards for load capacity and cycle testing.
For projects in the GCC region, ensure that all imported kitchen equipment and organization systems comply with SASO SABER certification requirements. European markets require CE marking and compliance with EN standards for kitchen furniture and hardware.
10 Cost-Saving Strategies
- Buy factory-direct from Foshan manufacturers instead of retail to save 40-60% on organization hardware.
- Start with pull-out shelves as the highest-impact, lowest-cost upgrade for deep cabinets.
- Use tension rods as instant dividers for baking sheets and cutting boards at minimal cost.
- Repurpose existing containers before buying new ones. Clean glass jars from purchased foods make excellent storage.
- Measure before buying to avoid returns and wasted spending on wrong-sized organizers.
- Buy in bulk sets for clear containers instead of individual pieces to save 20-30%.
- Install shelf pegs yourself instead of hiring a professional. A pegboard jig costs under $15.
- Declutter first to reduce the number of organizers you need to purchase.
- Choose adjustable over fixed organizers so they adapt as your needs change.
- Maintain the system with a quarterly shelf audit to avoid re-purchasing due to backsliding.
Quality Control Checklist for Purchased Organizers
| Item | Check | Pass Criteria |
|---|---|---|
| Pull-out shelves | Slide mechanism | Full-extension, ball-bearing, smooth operation |
| Drawer dividers | Material strength | Bamboo or metal, not flimsy plastic |
| Lazy Susan | Rotation mechanism | Ball-bearing, not plastic-on-plastic |
| Clear containers | Lid seal | Airtight, BPA-free, stackable |
| Shelf risers | Weight capacity | 10+ lbs per tier minimum |
| Metal organizers | Material grade | SUS304 stainless steel for food contact |
| All items | Dimensions | Match cabinet interior measurements |
Shipping and Delivery Timeline
| Phase | Duration | Key Activities |
|---|---|---|
| Order confirmation | 1-2 days | Confirm specs, dimensions, quantities |
| Production (bulk orders) | 15-30 days | Manufacturing, quality checks |
| Quality inspection | 1-3 days | Pre-shipment verification |
| Ocean freight (Asia to GCC) | 15-25 days | Shipping, customs clearance |
| Inland delivery | 2-5 days | Last-mile to project site |
| Total (bulk order) | 35-65 days | Plan 2-3 months ahead |
Definitive Checklist: 10 Steps to an Organized Kitchen
- Declutter everything — Remove all items from cabinets and sort into keep, donate, discard.
- Measure all cabinets — Record interior width, depth, height, and door swing clearance.
- Define your zones — Assign prep, cooking, serving, storage, and cleaning areas.
- Install pull-out shelves — Start with the deepest base cabinets for maximum impact.
- Add drawer dividers — Organize utensils by function in each drawer.
- Decant dry goods — Transfer to clear airtight containers with labels.
- Use vertical space — Add shelf risers, under-shelf baskets, and door-mounted racks.
- Address corner cabinets — Install lazy Susan or blind corner pull-out system.
- Label everything — Every container and zone gets a clear label.
- Maintain quarterly — Schedule shelf audits every 3 months to prevent backsliding.
Related Resources
- Commercial Kitchen Equipment China Sourcing Guide (2026) — Complete guide to sourcing commercial kitchen equipment from Chinese manufacturers.
- Hotel Office Furniture Sourcing from China — How to source hotel office furniture including desks, chairs, and FF&E.
- China Sourcing Agent vs Direct Factory: Real Cost Breakdown — Compare sourcing models with actual cost analysis and case studies.